


|
Product Details:
|
|
| Place of Origin: | China |
|---|---|
| Brand Name: | Jekit |
| Model Number: | Brembo BM8 |
|
Payment & Shipping Terms:
|
|
| Minimum Order Quantity: | 1 set |
| Price: | Factory Price |
| Packaging Details: | Box Size 45*45*45cm |
| Delivery Time: | 5-7 days |
| Payment Terms: | Western Union, T/T, Paypal |
| Supply Ability: | 600 sets Per Month |
|
Detail Information |
|||
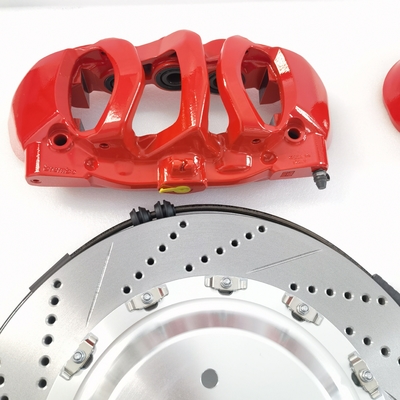
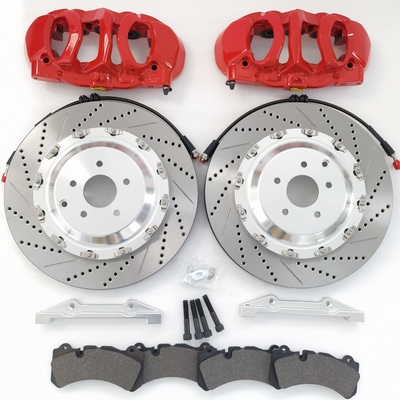
| Item Name: | BM6 Brake Caliper With Brake Pads | Caliper Pots Size: | 6 Piston |
|---|---|---|---|
| Disc Size: | 405*34mm | Caliper Material: | Alloy Forged |
| Fit Wheel: | Rim 20-22 Inch | Car Model: | Porsche/BMW/Audi |
| Caliper Color: | Red Color | Disc Type: | Drilled Slotted |
| Front/Rear Wheel: | Rear Wheel | ||
| Highlight: | Alloy Forged 6 Pot Brake Kit,175mm 6 Pot Brake Kit |
||
Product Description
6 Pots Brake Caliper Brembo BM6 With 405*34mm Rear Brake Drum 175mm
GETTING STARTED
Before you begin working park your car on level ground with the engine off and the emergency brake on. Raise the car safely using a floor jack and secure it with jack stands. Also, we will be dealing with brake fluid so be sure to wear protective clothing, eyewear and gloves. You will need to remove and reinstall the wheel once this job is done.
Step 1
Remove the Brake Caliper Mounting Bolts: Identify the caliper that is to be replaced. Only replace one caliper at a time. This will help control the brake fluid leakage and confusion while the job is being done.
Using a wrench or socket remove the caliper slide bolts. These bolts can be tight so make sure the tool is squarely on the head of the bolt before applying pressure to loosen. Then grasp the caliper and forcefully and rock it back and fourth. This is to cause a small air gap between the caliper piston and brake pads.
Step 2
Remove the Brake Line: Once the caliper mounting bolts have been removed. There are two methods of stopping brake fluid from running out of the master cylinder once the brake line has been removed. The preferred method is to remove the brake flex hose from the frame brake line and use a rubber cap to plug it off. The reason for this is the master cylinder will drain out of fluid once the caliper line is removed which will cause problems bleeding the system. This would be a good time to replace the brake line as well.
Locate the brake line where it connects to the frame mount. Use a line wrench and loosen the fitting. A line wrench is used because these lines can be tight and if you use a regular wrench on them it could round the fitting causing a problem while trying to remove it.
Once the line has been broken loose you can use a regular wrench and continue removing the fitting which makes the job faster. Brake fluid will start to leak out slowly.
After the line is loose brake fluid will be dripping from it metal tube so be ready with a shop towel to catch it.
Now take the rubber cap and install it over the metal brake line to stop the fluid from leaking out. Next use a shop towel to wipe up any excess fluid and then flush with water and soap.
Next, adjust the vise grip to gently pinch the rubber brake hose just enough to stop the fluid from flowing. It's important to not over tighten the hold on the rubber line because you don't want to damage it. If the brake line has cracks or is leaking replace it along with the caliper. Some mechanics don't like to use this method because it can sometimes break down the internal lining of the hose if the vise grip is adjusted too tight.
Now it is time to remove the brake line from the caliper. Take a mental note or grab your cell phone and take a picture on how the brake line looks going from the frame to the caliper so you can reassemble it in the same manner. Locate the mounting bolt which is sometimes called a banjo fitting and break it loose with a socket or wrench. A small amount of brake fluid may leak out which is normal.
There will be two sealing washers that are made of copper or aluminum which are on either side of the brake line bulk head fitting. These washers will need to be replaced and should be included with the replacement calipers. If it is too difficult to loosen the fitting then reinstall the caliper onto the mounting bracket which will hold it while undoing the banjo bolt. Grasp the caliper once the line has been undone because it is heavy and can cause injury if it falls.
Step 3
Remove the Caliper: Hold the caliper and separate it from the mounting bracket and the rubber flex hose. A small amount of fluid may leak out. You are now we are ready to match the old caliper to the new unit.
Step 4
Clean the Brake Line Mount: Hold the brake line and use a shop towel to clean the end from dirt and corrosion. Both top and bottom must be clean because the sealing washers will leak if these surfaces have obstacles.
Step 5
Prepare the New Caliper for Installation: Get yourself a top quality rebuilt brake caliper set which helps you do the job right. It is very frustrating when you get the job done and you have a leak or the caliper doesn't work right because of a cheap rebuild. There are many rebuilders out there so go with a name brand to ensure its quality from Amazon or a local auto parts store. Sometimes a rebuilt caliper will have a core charge involved so don't throw the old calipers out because they are worth some money. Return the calipers in the box them came in. It's a good idea to store them in a plastic bag to help control any brake fluid that may leak out during transportation.
Here is the alternative method to stopping the brake fluid from leaking which we have used in the shop many times. Take two pieces of fuel line and cover the jaws of a pair of needle nose vise grips.
The brake fluid port will have a dust cap installed which sometimes holds the new sealing washers which are included in higher quality rebuilt calipers. Use a flat blade (standard) screwdriver to remove the cap and set the washers to the side for installation
Remove the new slides from the plastic bag supplied with the caliper (some calipers have the slides installed from the rebuilder). These slides are either pre-lubed or should be installed with a small amount of brake lube. If the slides are installed dry the caliper will stick causing the brakes to pull and the pads to wear unevenly.
Some calipers have a dust boot that must be installed to protect the slides from getting moisture between the pin and the housing which can hinder the caliper's performance. Use a hammer and socket to gently push the rubber seal into place. This can take some work so double check them to make sure the seal is completely in place.
Now the caliper is ready to be installed, push the pads into the piston and outer plate. This will help with the installation over the rotor and caliper mounting bracket. Sometimes in shipping the piston will get pushed slightly outward, if so it can be re-insert it by using your hand or large C clamp or channel locks
Step 6
Install New Sealing Washers: Clean the banjo bolt thoroughly using a shop towel and brake cleaner. Check the bolt for any cracks or scores in the sealing surface and replace it if needed, this will help avoid leaks.
New mounting hardware which includes the bolts and additional sealing washers are included with most rebuilt calipers. This will complete the installation preparation and give it a professional touch. When reinstalling this hose it's recommended that a new copper sealing washer is installed.
STEP 7
Install the New Brake Caliper: While holding the caliper close install the clean banjo bolt with the inner sealing washer still in place. Then push the bolt through the brake line fitting and install the outer sealing ring as now the brake line is ready to be installed.
Thread the bolt inward into the caliper by hand to avoid cross threading. Position the brake line in the correct orientation (with out bends or twists). Tighten the bolt firmly to help seat the sealing washers. Don't over tighten them because the bolt is hollow and it can break.
While watching the brake flex hose for twists set the caliper into place over the rotor and down onto the mounting bracket. Be mindful of the pads and the rotor to avoid unnecessary contact or force to push the caliper into place. Never use a hammer to install a caliper it should drop into place naturally.
If you have trouble getting caliper all the way down pull the caliper back up and check the slides to make sure they are fully retracted into the housing by repositioning them outward. This will help install the caliper fully.
After the caliper has been set down over the rotor and onto the mounting bracket install the new mounting bolts and thread them in by hand to avoid cross threading (some manufactures use thread lock such as lock-tight). This can take a little jostling to get them started so hand in there. You can also push the rotor onto the bearing hub to help. Continue until both are hand threaded into the bracket
Use a wrench or socket to tighten the mounting bolts evenly while re-checking the tightness with a torque wrench. Most manufactures will tighten these bolts from 40 to 50 foot pounds
Reinstall the brake line into the fitting and tighten using the boxed end of the wrench.
Remove the brake line locks to allow the brake fluid to start following into the caliper. This rubber line will be pushed back into shape the first time the brakes are applied so don't worry if there is a small indentation from the clamp. To finish and continue this repair you must bleed the brake system. After the brake bleed is complete check the brake pedal operation and reinstall the wheel. Never drive a car without a good brake pedal. When driving the car listen for abnormal noises and recheck the job if needed.
| Item Name | Brembo BM6 Caliper Disc Kit |
| Pots number | Six piston |
| Color | Red caliper |
| Rotor | 405*34mm |
| Disc type | Drilled Slotted Disc |
| Center Type | Floating Center Cap |
| Car model | Audi/BMW/Audi/Porsche |
| Wheel Rim | Rim 20/21/22 |
![]()
![]()
![]()
Enter Your Message
| Guangzhou Yuanxing Industrial Co., Ltd. |
| Room 302, Building 5, No. 7, Wu Alley, Laowu Street, Dongping Village, Yongping Street, Baiyun District, Guangzhou |
| 86--18816787278 |
| 18816787278@163.com |


