

|
Product Details:
|
|
| Place of Origin: | China |
|---|---|
| Brand Name: | Jekit |
| Model Number: | GT8 |
|
Payment & Shipping Terms:
|
|
| Minimum Order Quantity: | 1 Set |
| Price: | Factory Price |
| Packaging Details: | Box Size 45*45*45cm |
| Delivery Time: | 5-7 days |
| Payment Terms: | Paypal, T/T, Western Union |
| Supply Ability: | 600 sets per Month |
|
Detail Information |
|||
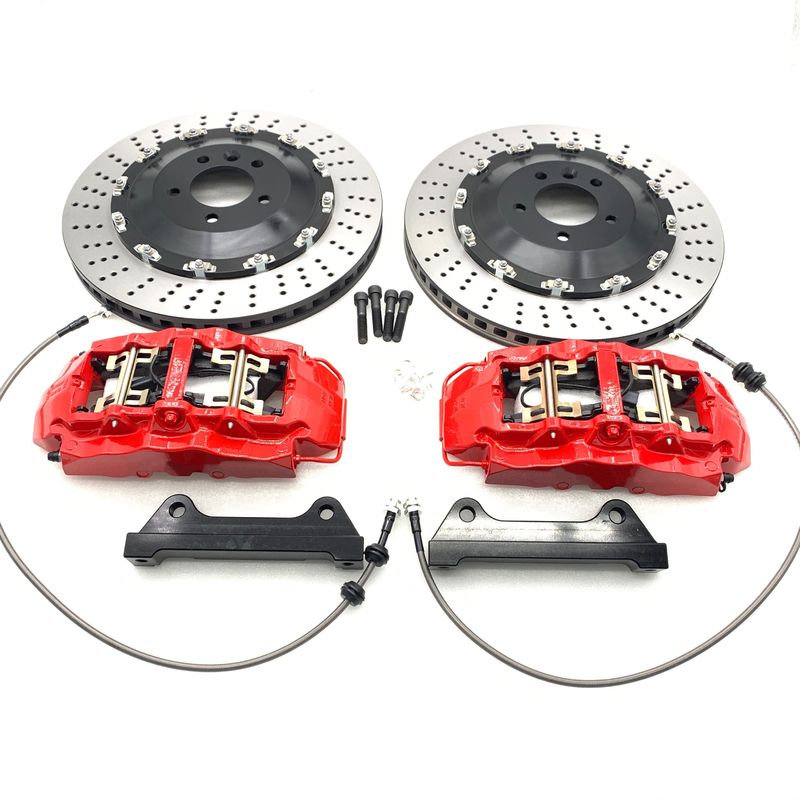
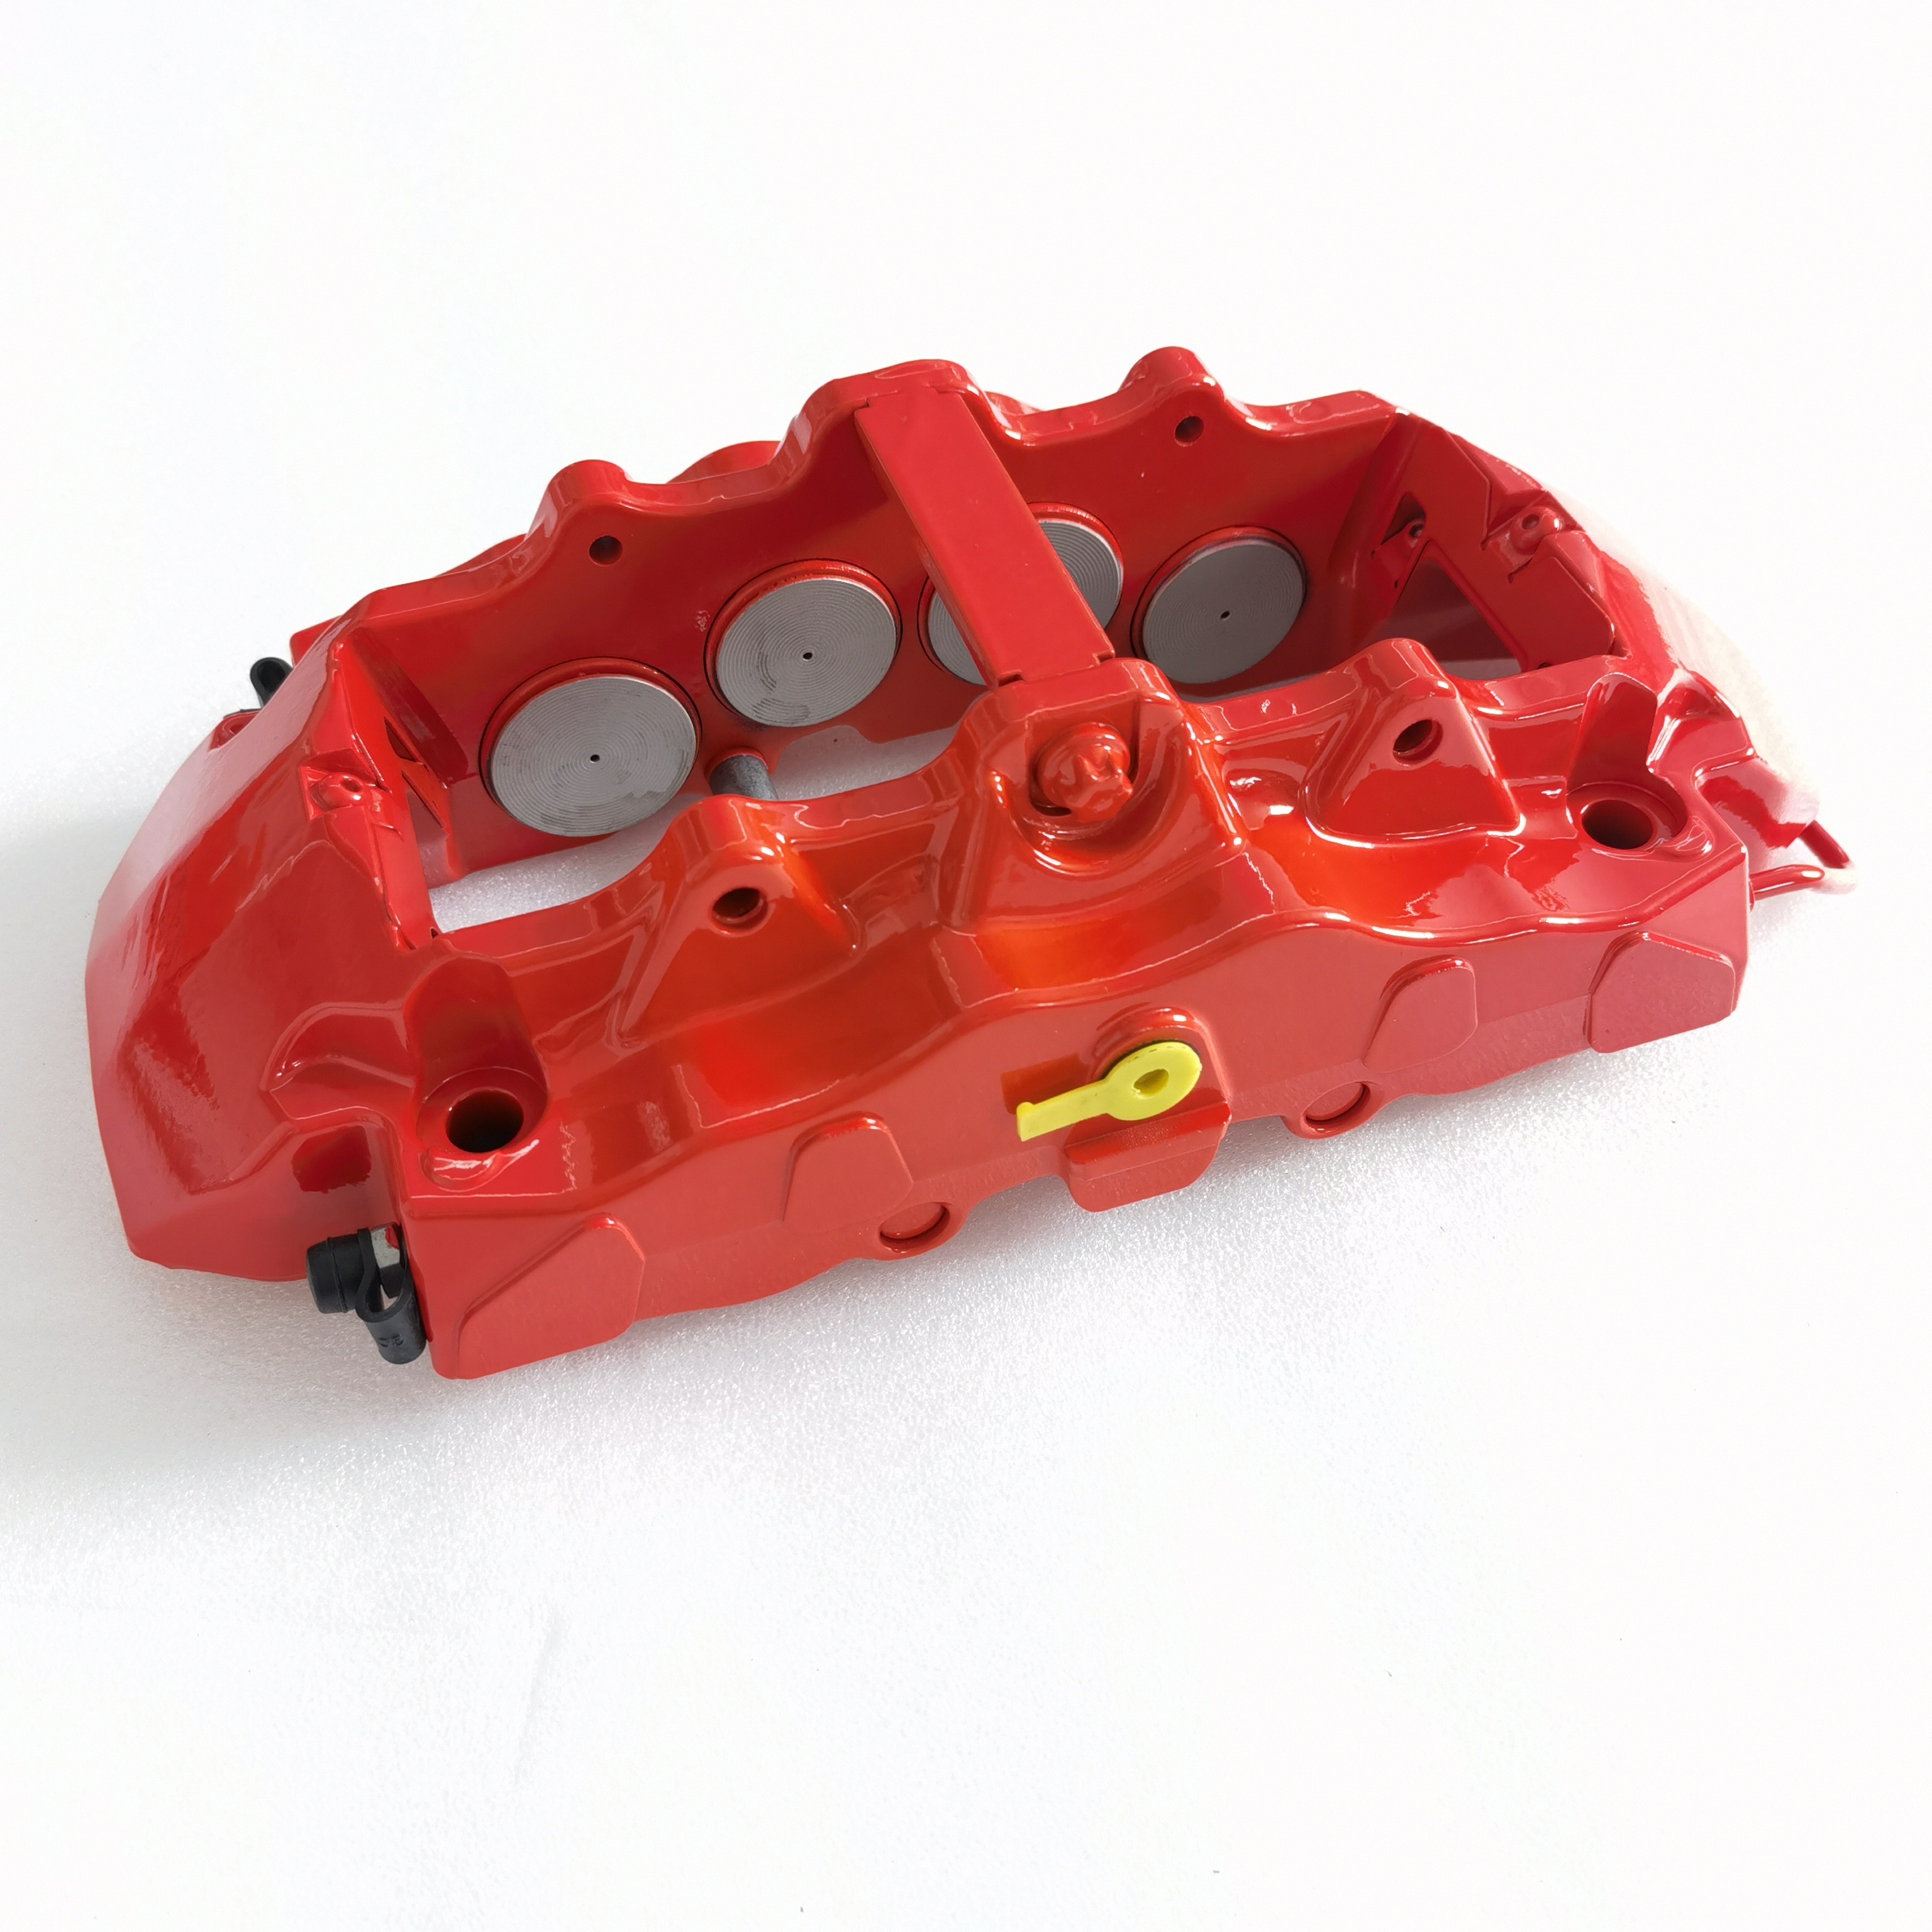
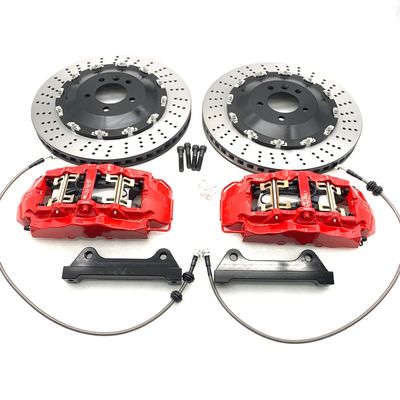
| Item Name: | 6 Pot GT8 Brake Kit | Caliper Pots: | 8 Piston |
|---|---|---|---|
| Color: | Red | Caliper Material: | Aluminum |
| Disc Size: | 405*34mm | Disc Type: | Drilled Floating |
| Fit Wheel: | Rim 21 Inch | Disc Material: | Grey Cast Iron HT250 |
| Highlight: | 405x34mm Disc 8 Pot Brakes,GT8 8 Pot Brakes,HT250 disc brake conversion kit |
||
Product Description
Jekit Auto Brake Caliper 405x34mm Disc Rotor Aluminum 8 Pot Brake
Is Replacing a Brake Caliper Hard?
Replacing a brake caliper on most vehicle models is pretty much a straightforward repair. You can do this project at home using some common tools. Still, specially if your car comes with an ABS system, you need to take certain precautions. But don't worry. This guide tells you how to approach this project at home, and, whether your car has a conventional or ABS system, the steps you need to follow for a smooth brake caliper repair.
Steps to Replace Your Brake Caliper
Locate the brake caliper.
Minimize brake fluid loss.
Remove the old brake caliper.
Install the new brake caliper.
How to bleed the brake line.
Strategies and pro tips for a successful brake caliper replacement.
Each of these steps is described in detail below.
Tools You'll Need for This Project
Shop rags
Piece of clean plastic sheet
2 chocks
Lug wrench
Floor jack
2 jack stands
Small drain pan
Brake parts cleaner
Ratchet, extension and six-point sockets
Line wrench
Wire hanger
Wire brush
Torque wrench
tape
New brake fluid
Piece of clear rubber hose
12oz plastic container
AND, IF NECESSARY :
Torx bit or Allen wrench
Rotary brush and drill
C-clamp or retracting tool
High-temperature grease
Silicone grease
How to Locate and Replace the Brake Caliper
On fairly new vehicle models, check your car owner's manual before you start this repair. For better performance, some models offer energy brakes that self-activate. On these models, your owner's manual or vehicle repair manual should tell you how to deactivate the brakes.
With ABS systems, take precautions to prevent air from entering the brake system. Purging some of these systems requires special equipment, and your dealer or shop may be your only option for the procedure.
How to Minimize Brake Fluid Loss
Pop the hood open and use a shop rag to thoroughly clean the brake master cylinder. The master cylinder attaches to the brake booster--a drum-like component mounted on the driver's side of the firewall.
Unscrew the master cylinder reservoir cap and place a piece of clean plastic sheet on top of the opening.
Then, replace the cap on top of the plastic sheet and tighten the cap. This will create a vacuum and help prevent much fluid loss when you detach the brake line from the brake caliper.
How to Remove the Brake Caliper
Engage the parking brake (unless you are replacing a rear caliper) and use two pieces of wood to chock the front or rear wheels (the side you won't be working on). This prevents the car from rolling while you work on it.
Loosen the wheel lugs on one or both front or rear wheels. NOTE: If you are not familiar with the caliper assembly, it's a good idea remove both wheels so that you can use the other assembly as a reference point when installing the new caliper.
Raise both wheels using a floor jack.
Place the vehicle on jack stands and finish removing the wheels.
Place a small drain pan under the caliper to catch any brake fluid that might drain out of the brake hose.
Disconnect the parking brake cable, if you are working on a rear caliper. Consult your car repair manual, if you need help.
On some vehicles you'll need to remove a brake pad wear sensor, usually located on one of the brake pads. Carefully remove the sensor (WARNING, this sensor is fragile) using a pair of nose pliers. If necessary, consult the repair manual for your car make and model.
Locate the brake hose connected to the brake caliper (usually on the upper, back side of the caliper).
Thoroughly clean the brake hose end, bolt, and fitting on the brake caliper using a shop rag and brake parts cleaner to prevent contaminating the brake system. If the brake assembly is covered in dust, don't blow it out; only use brake parts cleaner spray to remove it.
Using a line wrench or ratchet, extension and a six-point socket, loosen and tighten back the brake hose snugly, just enough to prevent brake fluid loss. Avoid using a regular wrench here to prevent rounding off the head of the bolt securing the hose.
Then, loosen and remove the caliper mounting bolts. Some calipers have a mounting bolt on each bottom end, which allows to completely remove the caliper off the mounting bracket; other models use a bolt on one end that you can remove to swing the caliper upwards. Depending on your car model, you'll need a Torx bit, Allen wrench, or regular wrench or socket and ratchet to unscrew the caliper mounting bolts or pins.
Once you remove the mounting bolt(s), carefully work the caliper off the rotor, or swing the caliper upwards. NOTE: Some caliper mounting bolts have a set of tabs at the end. On this, you need to squeeze these tabs with a pair of needle pliers while prying the bolt head at the other end to slide the bolt off the caliper.
Take note of the position of any caliper hardware you may need to remove so that you can install it on the replacement caliper (clips, pad support, springs, anti-rattle clips, shims).
Some brake pads mount on the caliper itself; others mount on the caliper mounting bracket. If the brake pads are mounted on the caliper itself, you may need to pry off the outer pad using a screwdriver. The inner pad may mount to the piston with a clip that attaches to the pad back plate, so you'll need to carefully pull the pad off the caliper piston.
Use a wire hanger to secure the caliper to a suitable suspension component to prevent the caliper from hanging by the brake hose; otherwise you'll damage the hose.
Keep the brake fluid level aove the MIN mark on the reservoir when working and bleeding your brakes.
Keep the brake fluid level aove the MIN mark on the reservoir when working and bleeding your brakes.
Photo courtesy of Frettie on Wikimedia
How to Install the New Brake Caliper
Clean the brake assembly using brake parts cleaner and remove rust from the assembly, specially those parts on the mounting bracket that come in contact with the caliper. This is critical on sliding calipers, which provide grooves for the caliper to slide on. Rust may cause the new caliper to get stuck and freeze during operation. Use a wire brush or a rotary brush and a drill to remove rust off the wheel assembly surface and bracket.
Before installing your new brake caliper, carefully read the instructions that come with it. Your caliper may come with special grease already applied or in a small package that you need to apply. Make sure to use this grease following the manufacturer instructions.
Transfer the brake pads to the new brake caliper or have them ready on the caliper mounting bracket, depending on your specific model. If possible, replace the mounting hardware, like springs, clips, and anti-rattle clip.
The new caliper should have the piston fully retracted, ready to install. If not, you can use a C-clamp to retract the piston slowly into its bore when working on a front caliper. Place the clamp over the caliper and position the inner pad on the piston. Rotate the clamp large screw to push against the inner pad to retract the piston. On rear calipers you probably need a special retracting tool you can barrow from your local auto parts store. Consult your vehicle repair manual, if necessary.
On some models, you need to apply a layer of high-temperature grease to the steering knuckle where it contacts the brake caliper. If necessary, consult your vehicle repair manual.
When ready, place the caliper in position. Add a layer of silicone grease to the caliper mounting bolts (pins) and to the insulators (where you need to insert the bolts), if you have a single piston caliper and the mounting bolts allow caliper movement. Then install the caliper mounting bolts by hand and tighten the bolts to the manufacturer's suggested torque, using a torque wrench. You can find the recommended torque in the repair manual (or aftermarket manual) for your particular vehicle make and model.
Remove the bleeder screw using a wrench. Apply tape to the screw threads (around three turns) and reinstall the screw. Start the screw by hand first and then tighten the screw snugly with the line wrench. Don't tighten the screw completely until after you bleed the caliper later.
Now, have the new copper washers ready for the brake hose and the line wrench. When ready, disconnect the brake hose from the old caliper and connect the hose to the new brake caliper. Tighten the bolt just enough to prevent brake fluid from leaking.
Use a shop rag to wipe clean any brake fluid you may have spilled during the transfer of the brake hose.
Remove the plastic sheet from the brake master cylinder.
Bleed the brake line. If you don't have an assistant to help you bleed the line, you can do it yourself using a hand-held vacuum pump in about one minute. Check out the instructions in the article "Brake Bleeding With a Hand Held Vacuum Pump" to bleed the brake line, or the whole system if you have to. Otherwise, follow the steps described in the next section.
You can use a manual vacuum pump to bleed the caliper and brake line or get the help of an assistant.
You can use a manual vacuum pump to bleed the caliper and brake line or get the help of an assistant
| Brand | Jekit |
| Caliper Name | GT8 |
| Number of pistons | 8 pistons (Front wheel) |
| Suitable for wheels | suitable for 21 inches |
| Rotor Size
|
405x34mm |
Disc Type
|
Drilled Floating |
Enter Your Message
| Guangzhou Yuanxing Industrial Co., Ltd. |
| Room 302, Building 5, No. 7, Wu Alley, Laowu Street, Dongping Village, Yongping Street, Baiyun District, Guangzhou |
| 86--18816787278 |
| 18816787278@163.com |